Showing posts with label wargaming. Show all posts

Monday, 31 August 2026

The Sailor and the Dancing Girl by Andy Copestake - Book Review

With a title that sounds like a back-catalogue effort from the Hallmark Channel, or maybe a mid-career musical theatre number by David Essex, The Sailor and the Dancing Girl is instead one of the latest releases in Helion and Co's "From Reason to Revolution" series from the keyboard of Andy Copestake.

Having known Andy a good few years (politeness demands that I state not the actual figure, but a driver of a similar age would have a considerable no claims bonus by now!) and being fellow TWATS (Tantobie Warfare And Tactical Society), I'd known that this tome was coming for a while now. Full disclosure: I paid for this copy with my own money, and neither Andy nor Helion & Co have had any input in to this review. Nor have they had sight of its contents prior to its public posting.

As soon as the title was announced on the Helion website, I signed up for release notification, and on day of publication, ordered it. Even with the vagaries of The Royal Mail these days, the package arrived a few days later, and upon opening it...

"Well, hello there little fella! You're a wee bit dinkier than I recall!"

Presumably for cost and sustainability reasons, the book that arrived was indeed smaller than previous volumes in the series - here's a comparison between Andy's first Helion release and his latest. 

Whilst the text is a bit smaller and thus slightly more testing on these ageing peepers of mine (even with the reading glasses - yes, gentle reader, I'm at that stage of life), the overall result isn't too bad. Indeed, popping the book into my work bag for a couple of commutes to the office made me realise that the new format is certainly better if you want to carry the tome around. And as always with Helion's publications, the actual physical quality cannot be faulted.

Coming in at just over 210 pages, The Sailor and The Dancing Girl's subtitle tells the reader everything they should expect. The campaigns of General George Thomas and the Begum Somru are an intriguing mix of politics, warfare during the decline of the Moghul Empire, and inter-personal drama. Such events require background, and this is supplied by the opening chapters detailing the roles of mercenary's in 18th Century warfare, and the nature of the British involvement in Bengal.

From there we are introduced to the mercenary Walter Reinhardt. His marriage to a dancing girl, Farzana, allows the lady to inherit his brigade of troops, and rule the principality of Sardhana as the Begum Somru.

The narrative then switches to the life and times of George Thomas. Warfare and politics intertwine as battles are fought, alliances made (and betrayed), and the reach of economic colonialism asserts a new order on India.

This is another quality piece of work from Mr Copestake and one that has been a bit of a passion project for him. The narrative has a well-researched depth, and the bibliography contains a wealth of primary and secondary sources. The author isn't afraid to question existing histories on the subject matter, and where he does, the rationale provided is capably supported by references to the relevant sources. 

Battles and machinations are described with clarity, and the imagery provided varies from contemporary illustrations and Victorian artwork, to a handful of modern photographs of the Red Fort. There are maps of general locales as well as for specific battles, and the usual mid-section artwork is nicely done. 

Outside of the core text, there's a useful timeline, a chapter on the uniforms and organisation of the forces commanded by our principal pairing, and finally a list of known Europeans officers who held positions within those commands.

All in all, this is a very readable tome on an intriguing subject. Kudos to Andy and the team at Helion & Co for an excellent addition to the 'From Reason to Revolution" series, suitable for both historians and wargamers who wish to add verisimilitude to their on-table efforts. 

You can pick up a copy of The Sailor and the Dancing Girl from HMV and David Essex's website the Helion & Co website here.

Sunday, 15 February 2026

The Spanish Passion by Rob Anderson and Javier G. De Gabiola - Book Review

This is not, as the title may suggest to readers of a certain age, the latest addition to Mills & Boon's 2026 catalogue, but instead the most recent (at the time of writing) in the "Helion Wargames" series, and a timely one too considering that 2026 marks the 90th anniversary of the beginning of the armed conflict it covers.

Full disclosure for this review: I've known Rob via the show scene and a few games with the TWATS (Tantobie Warfare And Tactical Society) for a long time now. That association will not colour this post, I bought this copy with my own funds, and neither the authors nor the publisher have seen this review before it has been posted. 

With that out of the way, let's get down to business.

My knowledge of the Spanish Civil War is best summed up by stating that I've read Antony Beevor's 1999 history of the conflict, and that Orwell's A Homage to Catalonia is on my to read list. Even from such a limited background, I am very much aware that the conflict was not as simple as the general teaching of history likes to put across, and this is especially important when it comes to the concept of "historical wargaming." 

What we have here is a book of two, almost equal, halves - an approach that works very well in delivering the author's intentions. Rob handles the wargaming side, and Mr De Gabiola tackles the history - the events leading up to the War, what happened during it, and the materiel used by the combatants. Both write well, their distinctive voices clearly evident in the text, and this combination gives the reader, knowledgeable in the period or not, a very good grounding in the subject matter.

The are photographs and maps galore, and when we get to the wargaming section, some rather nice artwork by Renato Dallas. Tables are included to cover the naval and air forces, and summaries of the multitude of units each side fielded are succinct but detailed. Scenarios for gaming are suggested, and include diagrams and photography of troops on the table. There is a very handy painting guide, a list of manufacturers who cover the period in a variety of scales, and a bibliography that provides the reader with avenues of further research. 

What The Spanish Passion does, and Rob says this himself in the introduction that follows the useful timeline of the war, is give you the basics you need to deliver a table top game. Rulesets are up to you, but for the background and historical specifics, this book gets you going, and if you're only going to read one tome on the subject for gaming purposes, then this is the one for you. However, and this is a big "however", we are talking about historical wargaming, and Rob rightly says that further reading is recommended - hence the bibliography. For me, the gaming side of hobby is just a social enterprise, a laugh, so to speak. My actual interest comes from the history itself. Learning about the period is a source of enjoyment as well as allowing me to add flavour to the table experience when I'm umpiring. It also prevents that overly game-centric idea that one attendee to a show put into words a few years back - "Just because it wasn't there doesn't mean in can't be on the table."

Frankly, gentle reader, I think that's complete bull hooks. History is rich with detail and experiences, and whilst gaming for the sake of gaming might be the only thing about this hobby that floats your boat, by not diving into the actual history of the game you're playing, you're kinda missing the point of historical wargaming. And when it comes to the Spanish Civil War, this is the best starting point I know of. How far down the history rabbit hole you go is up to you, but the first step of that journey should begin with this extremely fine tome. Now, if you'll excuse me, I have to pay my respects to Catalonia

You can pick up a copy of The Spanish Passion from Helion & Co here.

Monday, 2 June 2025

Stop me if you've heard this one before...

For those out there who enjoy a touch of modern wargaming, there seems to be a common thread about boring games where a number of Challenger tanks engage an overwhelming number of enemy tanks and take down the lot. This can be quite tedious, at least for one side, if not both, so when I offered to jump into the chair for our next meeting of the TWATS using a partially amended set of Team Yankee rules that have been trialled before, that was the outcome I wished to avoid. 

Then Shaun emailed me the night before. Did I fancy adding a 28 tank T54/55 battalion and a 10-strong T62 company to the mix? Well, that kind of sunk my original plans, but seeing that huge numbers of 15mm vehicles can look damned impressive on the table, I gladly accepted the offer.

So it was that on the Saturday afternoon, Shaun, Steve, Paul, Andy and myself congregated at The Blue Bell in Kip Hill, who as well as offering good quality ales and a fantastic array of Turkish and British dishes, also host the Forlorn Hope Wargames Group. Sadly, the club itself will be closing in August so future plans are up in the air, but it's not the first time the TWATS have been venue-less, and we'll see what happens. 

Steve handled the Royal Marine contingent, and Andy presided over the main armoured force of six Challengers, a quartet of Scimitars, and some Warrior-bound infantry. For the opposition, Shaun was going to play with his frankly ludicrous amount of armour, and Paul would have total rights to the rabble of militia and the main striking force of a reinforced Republican Guard battalion. 

The premise was simple: the British were acting as a trip wire to prevent the Harraqui armed forces from invading their peaceful neighbour of Huwait (not, incidentally, a Geordie asking someone to slow down). The British could deploy their main force within 12 inches of their table edge, the Harraqui's the same from their end. The actual border was about 14 inches from that edge, and there was a border town on the Huwaiti side that Steve promptly decided to fill with his commandos. Their trio of support WMIK's were positioned just outside of the town. The British also had a strip of mines across a section of the table (the location of which was unknown to neither Shaun nor Paul), as well as an off-table battery of 8 105mm Light Guns. 

The Harraqui plan was simple - use the militia to push the RM's out of the town, and basically smeg the British with a full frontal assault using the older vehicles to mask the approaching Republican Guard heavies. 

And, to a degree, that plan worked to begin with. It took a couple of turns, but the militia performed better than expected (what would you expect for a rabble, even if they did have four T55's attached for the LOLs). Half of them took a smacking from the Light Guns after being caught out in the open, but once the town was cleared, their T55's restored honour by taking out a handful of the retreating British light-skinned transports as the latter raced for home. 

Before...

After...

It was not all one-sided, and the trio of Milan-wielding WMIK's dealt serious damage to the T62 company and were nibbling away at the T55 battalion before being pushed back by the militia.  

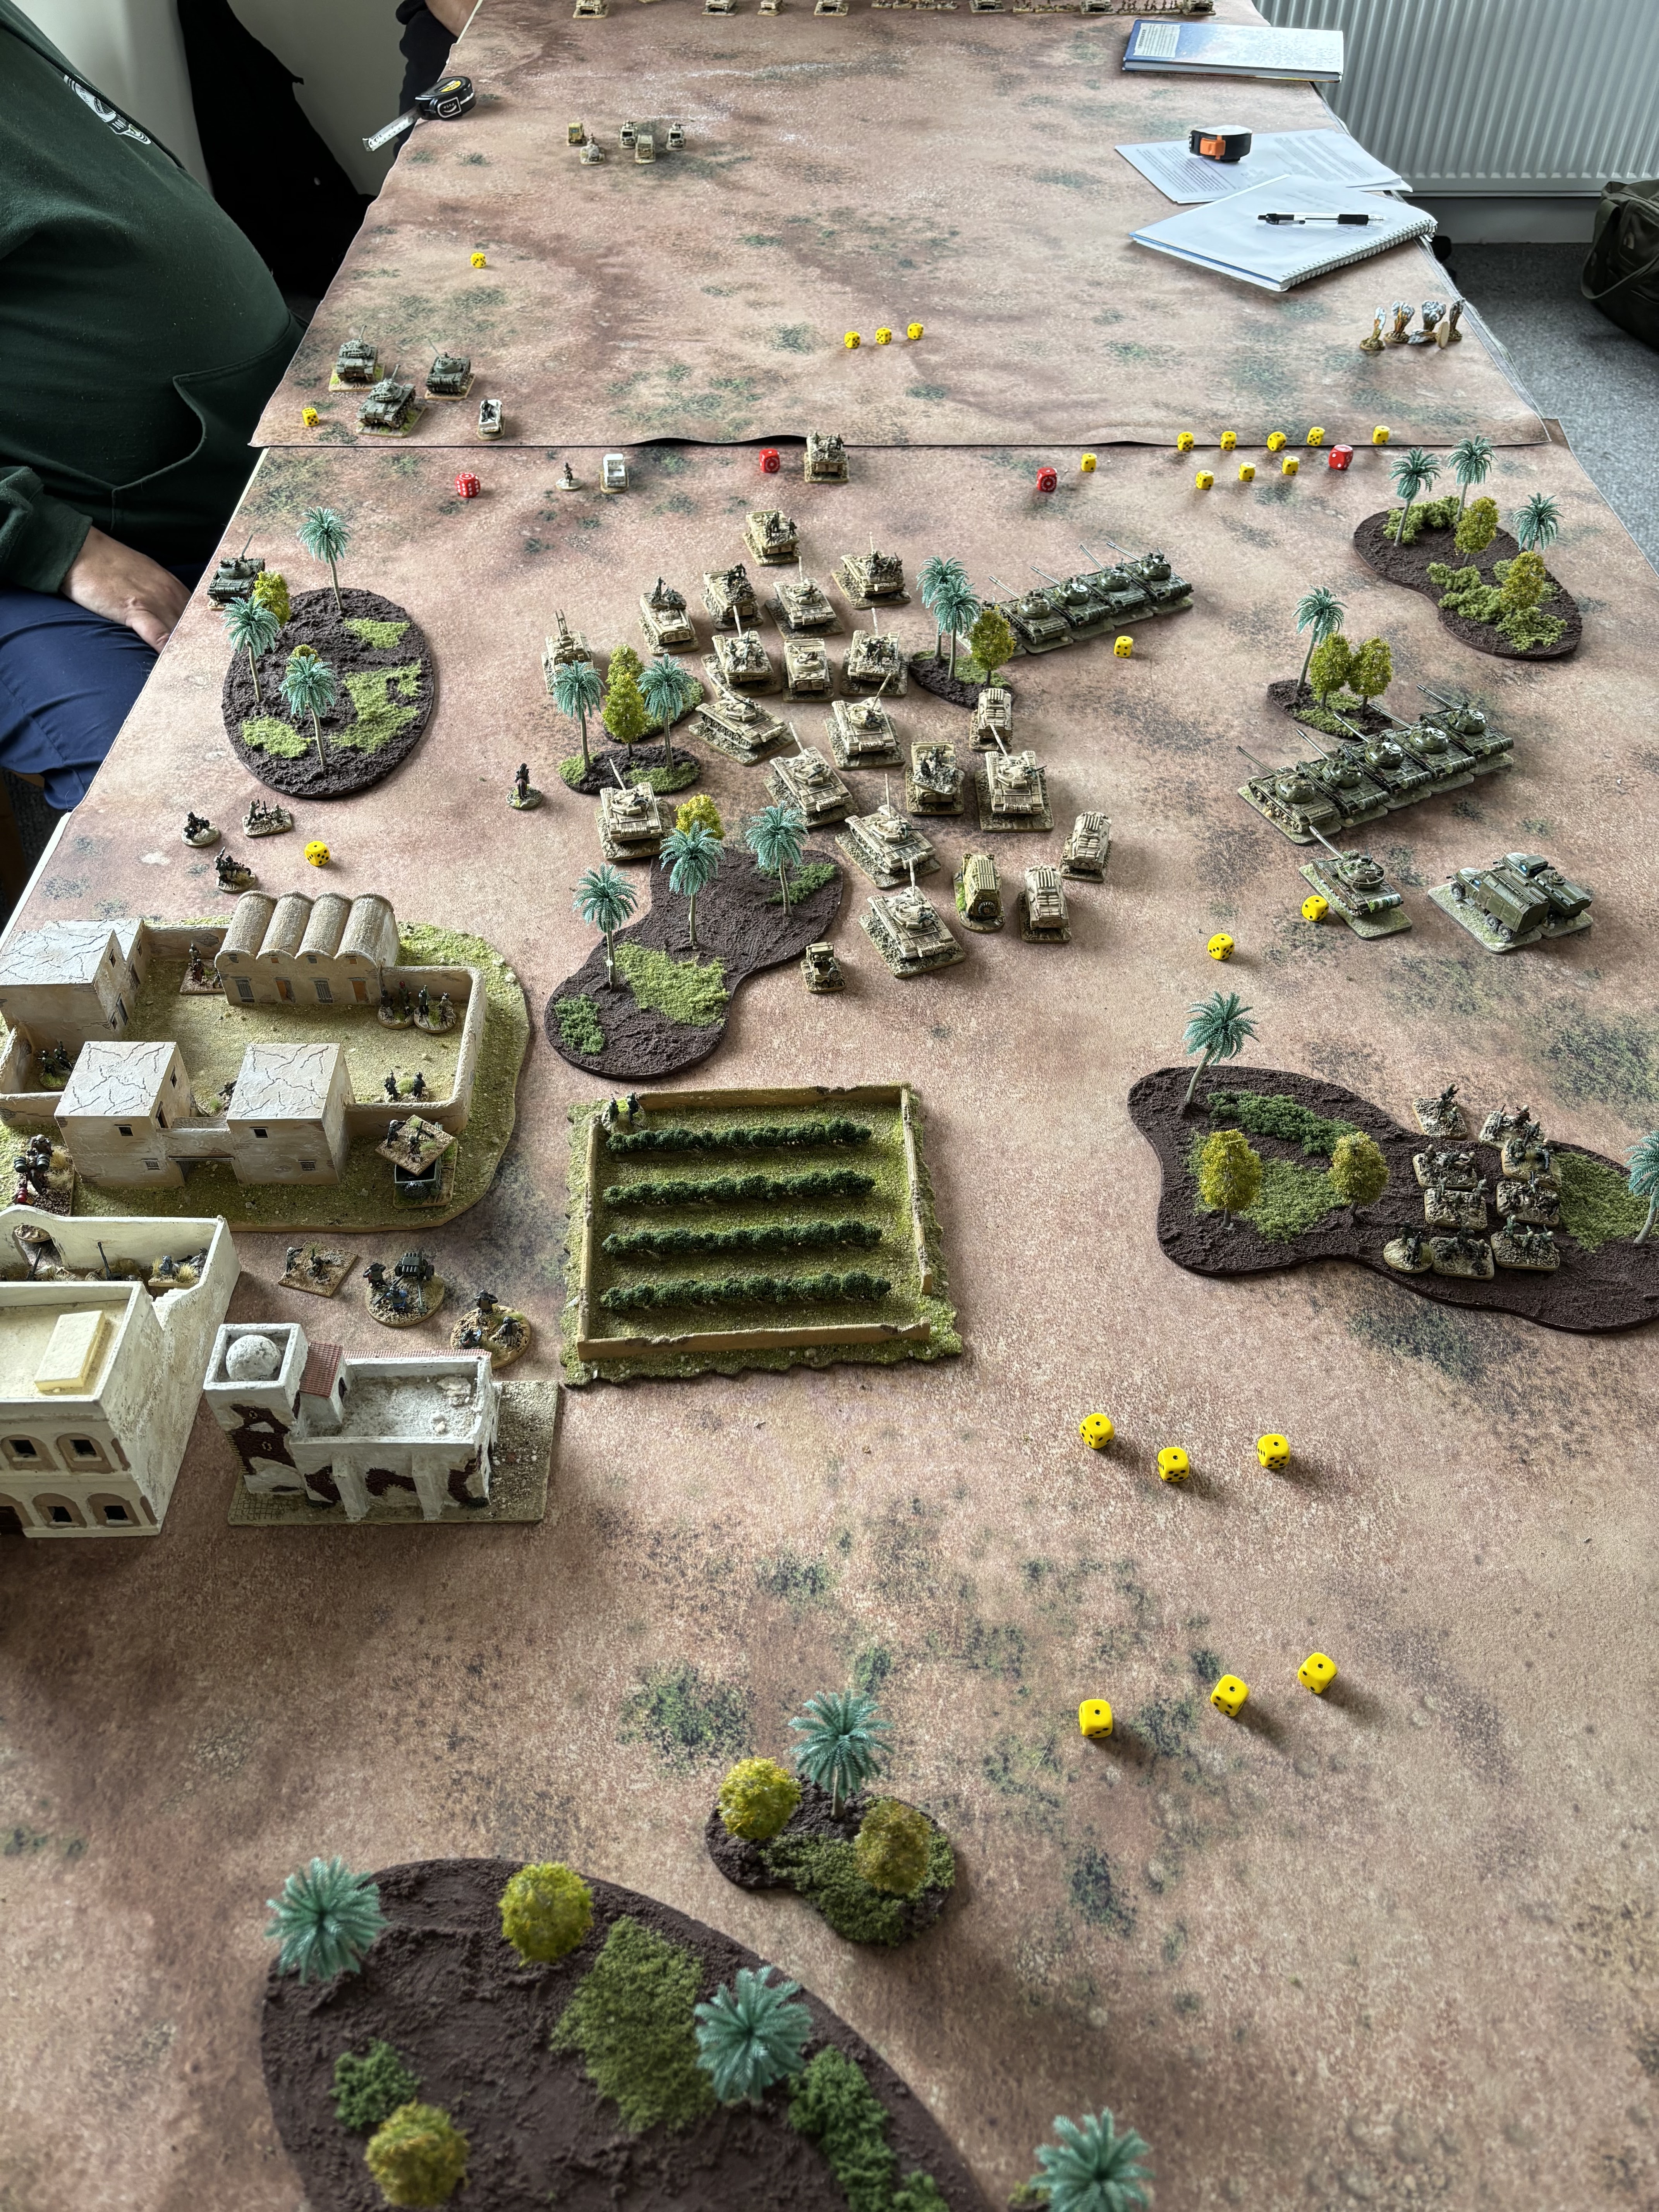
A light screen of recce Scimitars noted the approach of the T55's before turning back to safety, leaving the Harraqui forces free to continue their advance... straight over the thin minefield that the British had bisected the playing area with. Although not causing many casualties, those that did make it across were then immediately in range of the hull down Challengers. 

Each die is a vehicle casualty - and those T55's in the foreground are about to pass their deceased colleagues. 

What followed next was a stunning display of dice throws, halting the T55 lads in their tracks, but given the choice of either run away and being shot, or staying just out of range, the Harraqui commander chose the latter. The effectiveness of the British fire was tailing off, but it was enough to pause the attack, and the table seemed awash with yellow (and red - we ran out of yellow) marker dice. 

This left the Harraqui forces in a quandry - what could they do in the face of the Challenger "massive" and avoid the much maligned concept of a Challie turkey shoot? Time was pressing in the real world, so the game ended there, although there was a conversation had about  could be done.

Time permitting, the best case would have been to use the Republican Guard integral ATGM contingent to sit outside of Challenger range and pelt them with missiles until two or three were destroyed. Then, a single file advance of the Guard over the minefield outside of effective British fire before regrouping, and then charging with everything. As the umpire, I'd have allowed the T55 lot to re-engage, especially given the motivational techniques available to The Great Leader! 

This was a bit of a mixed game for me - the additional amendments to cater for damaged armour never came into play (based on these amendments from all the way back in 2018), and I'm searching for a better way to handle infantry and artillery - I'm not a great fan of either in the original Team Yankee rules, but since this is a work in progress set of amends, there's plenty of time to pull in more stuff. Shaun recommended Sabre Squadron, Andy proposed Combined Arms. Both will be consulted. I also think that I need to work on the unit stats for infantry in general - again, it's a TY thing. 

There was a slightly unsettled feeling after this game, and a lot of that was to do with the quick change in scenario - some of the questions raised during this game would not have been otherwise. Whilst this did lead to some discussion throughout the day, valid points were raised that will be addressed in future, and it was good to have input. Anything that makes the game play better to the period is always a plus, hence the rather Frankenstein nature of the rules. What I will add is that in future, if umpiring a period that some of the attendees have little knowledge about, maybe some cue cards might be in order so they have a basis of knowledge about the forces they control. Another point to consider me thinks.

Sunday, 8 September 2024

An 80's Naval S.A.G.A (Surface Action Group Affair).

The last Saturday in August saw another semi-regular gathering of the TWATS and in a sublime case of history repeating itself, I was in the chair for a game of Shipwreck and once again taking advantage of Steve's collection of Cold War floaty boats. If we do the same thing for the last Saturday in August next year, this could become a tradition. 

Iiiiiiin the Red corner!!!

There were five in attendance so I'd come up with an asymmetric scenario of four British destroyers and frigates against a lone Soviet cruiser. I had not counted on Steve being busy with his brushes and bring the Americans to the table. Oh well, best laid plans and all that.

Aaaaaand in the Blue corner!

Instead, we had a straight forward slug-fest, albeit it with a little room for tactical shenanigans. Andy and Shaun took control of the Soviet surface group made up of a Kirov-class battlecruiser, two Sovremmeny-class destroyers, an Udaloy-class destroyer and a Krivak II-class frigate. Paul and Steve had the American fleet, centred around an Iowa-class battleship, two Ticonderoga-class cruisers, a California-class cruiser and a Perry-class frigate. Yep, each side has a sacrificial target, but would they use them wisely?

In the middle of the area of operations were two small islands and each side basically had to get past the other. There were no aircraft to get in the way of the ship to ship combat. 

The Krivak in the distance looks kinda lonely.

The early turns were a selection of single and double moves to eat up the distance between the two forces, with the Americans switching on the Iowa's surface search radar but neither finding anything nor being detected itself. During this period, the Americans stayed in formation whilst the Soviets pushed the plucky little Krivak II out in front and eventually warmed up its radar, yet still detecting nothing. Someone had been thinking...

Turn 9 (these were very quick movement turns at this stage of the game) saw the Americans detect the Krivak's emissions and loft four speculative Harpoons from the Iowa. This led to the first combat phase, and with the Krivak beam on to the approaching US ships, it was able to use both its SA-N-4 mounts to take down the quarrelsome quartet in two combat turns (CT's). 

Back to the movement and the US go to flank speed. The Krivak got a radar fix the US's port wing consisting of a Tico and the OHP, yet still the US still hadn't picked up a hard lock on the Krivak. Even so, more missiles went a-flying. 

A pair a piece from the Iowa, port Tico and the OHP should have been enough, yet some deft Soviet missile fire (and some absolutely cracking dice rolls from Shaun) saw the last of the Harpoons downed without too much sweat, whilst the Soviet return of four SS-N-14's at the port Tico did raise eyebrows as the last of them was taken out by the cruiser's Phalanx. 

Vampires ahoy! (and guess who can't count!)

It was time for the gloves to come off, and with a good data link back to the main fleet, the Krivak did what it was supposed to do and let the gang know exactly where the Iowa, port Tico and OHP were. Each of the Soveremmeny's fired all eight of their SS-N-22's, one octet at the port Tico, the other at the OHP (overkill, I know, right?). The Kirov, having none of this "which is better?" bollocks, rippled all 20(!) of its SS-N-19's (no nukes in game, btw) at the Iowa.

Our American friends decided that the Krivak had lasted long enough, tasking the OHP to fire the last of its Harpoons at the offending frigate. Since they had not detected the main Soviet fleet, that was their only possible response. This began that last CT phase. 

The eight Harpoons were whittled away by the Krivak's dwindling supply of SAMs, with all but one of the SSM's succumbing to defensive missiles. It was at this point that the fortunate frigate ran-afoul of the flurry of fire, and some duff chaff dice rolling led to a single hit, bad enough to cripple the ship, yet not destroy it. Heroes of the Soviet Union medals all round me thinks. A tally of the remaining SAM rounds revealed a total of 2 remaining for the front mount - it was that close. 

Hard right turn, Clyde!

The American's were too busy to celebrate their first (and only) win as they had to deal with the incoming horde of SSM's. Both Tico's got in on the act, with the port ship proving the most capable as expected as they were an actual target, and it was never really in doubt that they wouldn't avoid some Sunburn issues. 

However, as the port Tico was busy saving itself, that left the OHP on their own, and that single arm launcher counted against it. They managed to down four of their Sunburn's, yet ineffective Phalanx and chaff dice rolls meant that it took four direct hits. The Krivak had been more than avenged as the Soviet claimed the first sinking of the game. Yet the game wasn't over yet...

Vampires ahoy! (With the right count now!)

There were still the issue of twenty "Shipwrecks" (not 22 according to one photo... oops! That was corrected before anything important happened though), and despite some truly fantastic AEGIS directed defensive shooting, nine still made it to CIWS range on the Iowa. Phalanx accounted for two of those, as did chaff, but the remaining five found their mark. Even with "on the fly" amendments for the presence of an armoured hull, there were too many well rolled hits and the Iowa was gone. And with that, the two fleets parted to lick their wounds, with the Soviets definitely the better off. 

Oh, Heavens Preserve us!

This was another fun game using Shipwreck and the addition of Steve's naval know-how demonstrated the benefit of having an umpire and players who know their stuff. Tis a game more than just about dice rolling. 

That being said, your humble umpire did offer both sides the opportunity to expand the game (to either or both side's benefit) via the liberal application of a fine single malt (there were several behind the bar) to the umpire, yet neither side did. Has there ever been a more fitting example of fair play from two competing sides? Probably, but hey, if you don't offer, you'll never know! Also, damn them!

A tough little ship, that one!

One thing that was was quite clear was that when the vampires were loose, there was a lot going on and much to keep track of, leading to my muttered comment of "Next time, can we do f-ing muskets?" 

I might return to the asymmetric scenario for our next naval game, but that'll be a while off yet (next August bank holiday weekend, gents?), as there are many more periods we can play with before a return to Cold War naval is warranted, and a benefit of being in such a varied group of TWATS.

Sunday, 11 February 2024

Tailships by John Rodgaard - Book Review

There has always been something about Cold War anti-submarine warfare that has fascinated me. From reading (and watching) The Hunt for Red October to devouring Red Storm Rising, playing 688 Attack Sub and Cold Waters, the subject has always had a depth (no apologies) that intrigues. And it is in the less well documented area of the Mediterranean that Helion and Co's recent release focusses its attention: Tailships - The Hunt for Soviet Submarines in the Mediterranean 1970-73.

You may think that this will be a bit of a dry text considering the topic and the brevity of the period it covers. That cannot be further from the truth. What the author, a 41-year veteran of the US Navy who retired at the rank of Captain, has done is integrate not only the technical and operational aspects of the small fleet of (outdated and obsolete) converted Destroyer Escorts, but also the social aspects of their crews, the process of manning them as well as the effect their deployments had of their families. There is much more to this than just "one ping only, Vasiley." 

The first couple of chapters set the scene - the Cold War and the importance of anti-submarine warfare. From there, we are given a guide to the theatre of operations, and how the Med was a tricky prospect for those in the ASW game due to its physical characteristics. The core details how the staging of the aging Destroyer Escorts was initiated as well as their operational deployments in-theatre. They quickly demonstrated their usefulness and became a valued capability, despite their mechanical weaknesses and rapid platform obsolescence. Would it be waspish of me to compare the situation to the current Type 23 debacle in the RN? Probably, but no less true. Where that particular organisation is at has many reasons, but running ships with 18-year design lifespans well into their fourth decade has come home to roost. I know, a discussion for another time, but the GP's are thirty plus year old and even the newest ASW ship commissioned nearly 22 years ago, and will be 33 when she reaches her planned decommissioning.

Back to the Med, and Tailships finishes off with a "what happened next" chapter, running quickly passed the SURTASS ships and the current much needed requirements for having towed array equipped vessels in service. 

Throughout, there are many contemporary photographs, with diagrams and maps detailing deployments, concepts and locales, and the centre section artwork is, as always, a feast for the eyes.  The author writes clearly and is as good with technical descriptions as he is with the social studies. The more than comprehensive bibliography at the back is certain to be a source of future reading too. For those looking for action packed sonar hunts, this isn't the book for you, but if you wish to learn more about how such an important capability came into being, and remains as critical today as it did then, then Tailships is the book for you. You can pick it up directly from Helion and Co here.

Saturday, 13 January 2024

Every Hazard and Fatigue by Joshua Provan - Book Review

When it comes to military history, I find it does me good to read a book on a subject I know next to nothing about. A cynic might suggest I should do the same in my professional life but I do know my CCFA's from my SYSTABS, and my KTYPES from my KSPAR6's... Mostly ;-). Anyway, at the Battleground show last November, I picked up a copy of Andy and Jim's book, Khalsa! (reviewed here) from the Helion & Co stand, as well as this little gem by Joshua Provan. Having read and thoroughly enjoyed his 2022 effort, Bullocks, Grain, and Good Madeira (reviewed here), I had an inkling that his treatment of the Siege of Pensacola in 1781 would be worthy of perusal. I was not to be disappointed. 


West Florida wasn't exactly the centre of Britain's struggle in North America but it was of some importance. With Spain joining the conflict on the side of the rebellious Americans and the French, it placed additional strain on British (and their allies) resources. Over some 200 pages, Mr Provan weaves a tale worthy of your time, even if to most it is a fairly forgotten vignette amongst the many more famous events that defined the conflict.


There are twelve chapters in total, along with orders of battle for each side. The opening sections introduce us to the Spanish, British and Allied Nations, with much attention placed on the latter whose importance was both recognised and, at times, unwanted given the difference in cultures. The author takes an even approach to all, supported by numerous contemporary letters and illustrations. 


After discussing the terrain and the locale, as well as the events that preceded the actual siege, we are then given four chapters that provide a day by day account of the struggle. Highly detailed, clearly organised, and with a pleasing narrative style, Mr Provan paints an evocative picture of siege warfare at a time when gentlemanly conduct was seen as a prerogative. It was not an easy fight, yet standards were held high even after the British surrendered, albeit not to everyone's satisfaction.


There are maps and imagery aplenty, and the central section with the colour plates will be of great use to those wishing to re-enact the struggle on a table top, as will the orders of battle. As always with Helion & Co publications, the bibliography included at the end of the book will provide a great deal of follow up reading if you're enamoured with this treatment of the siege. 


With highly readable prose and a narrative structure that builds to a dynamic conclusion, Every Hazard and Fatigue is another great release from Helion and a fantastic effort from Mr Provan, suitable for readers no matter their level of existing knowledge. If the American War of Independence/Revolutionary War is your thing, you'll do yourself a great favour in picking up a copy from Helion & Co here. It is also an essential purchase if you want to bring Pensacola to your wargaming table. The American War of Independence/Revolutionary War is not a period I have read much about (outside of a few more general texts), but having been spurred on by this volume, I dare say some further, more in-depth reading is required. I can give no higher praise. 

Saturday, 16 December 2023

Khalsa! by Andrew Copestake and James Main - Book Review

A recent release from Helion & Co's Helion Wargames series, Khalsa! aims to guide the wargamer along the path of enlightenment to putting soldiers on the table for the Anglo-Sikh Wars of 1845-46 and 1848-49. This isn't a ruleset per se, but it does offer more than the usual "this happened here" run through (essential as that is for historical wargaming). Is it any good though?


Before we continue, cards on the table. I have known Andy for more than 25 years, Jim even longer, and I count them both as very good friends. We have laughed (The Breakfast Pasty Business, The Veggie Burger Vignette - trashy detective novels in the making there!), cried (that two day show on the Yorkshire Coast) and gone through other less noteworthy (but no less funny) shenanigans involving wargames, wargames shows and the odd pint or two over the years. Does this colour my review? I hope not. Neither gent has had sight of this piece before posting, nor have they had any input to it. In addition, I purchased my copy via the Helion and Co website using my own funds.


With that in mind, what do you get for your £29.95? Well, the usual high quality Helion publication coming in at just over 180 pages and in full colour. Aside from the introduction, acknowledgements and timeline, there are eight chapters and three appendices, all finished off with a handy glossary. 

Chapter One provides the reader with an introduction to the rise of the Khalsa, their geographical reach, the types of troops they used, and the composition of the forces they fielded, mercenaries and all. There is more than enough helpful guidance on how they could be portrayed on the table. As is only correct, further historical information can be found in the sources quoted in Appendix A, three pages of which cover additional reading. 

Chapter Two brings us the forces of the Honourable East India Company (not a Ronseal title if you've read much about the corporate entity itself). Again, units and formations are covered, as are notable personages, and how they too could be applied to a game. 


Chapter Three is where the real wargaming fun begins with the battles of the First Anglo-Sikh War. Each action is given maps, orders of battle, and notes on gaming them. Photography of tabletop battles abound, and there is also the occasional illustration from 19th Century sources too (not contemporaneous but suitably period).

Chapter Four covers the Sieges of Multan and Herbert Edwardes' Campaign, before the fifth settles on Sir Hugh Gough's time in the sun from 1848-49. At this point, the commentary deserves a mention. There is little evidence of bias against either side, and where the British were poorly led, they paid the price accordingly. Some battles were close run things, others more accidental in nature, yet their portrayal here should give fine succour to those without even the flimsiest of prior knowledge. And again, if you'd like to know more, Appendix A is very much your friend. 


The Sixth chapter focuses on the colours and uniforms of the various forces, handy for the seventh chapter where a painting guide details the process of putting soldiers of the period onto the table. Each step is concisely written with accompanying imagery, and even my limited painting skills could follow the clarity provided here. 

The final chapter is where the true wargaming potential of the period is scrutinised. Tactics and what ifs set things off, but there are suggestions for the use of umpires (big fan of that approach personally), scenarios (both historical and fictional) as well as amendments that can be applied to a selection of commonly used rulesets for the period. As a side note, when the period was put on the table as a demo game at the recent Battleground Show in Stockton, the terrain modifications listed here were a very useful addition. 

Of the appendices, we have talked of A (ever so useful, I cannot state that enough - if you're partaking in historical wargaming, reading up on the period is essential). B is a suggested list of figures suppliers, whilst C provides several pages of Army lists, noting types of troops and the percentage each provided to the armies of the period. 


I have mentioned the imagery already but it must be said that between both authors' collections and those photographs supplied by Colin Ashton, there is more than enough lead eye candy for even the most cynical of gamers. 

That's it, and a fine publication it is too. There is the odd issue - mainly imagery placement. The black text over an image containing a black flag on page 37 is probably the most egregious example, and that joke on page 19 is possibly too obvious. OK, I am stretching here, but to be fair to the authors, I'd have been terribly disappointed if it hadn't have been made at some point!

Overall, this is another fine Helion & Co publication and one that deserves your attention if the period appeals. Well written, highly informative and a cracking starting point for those wishing to dive into the subject with little or no knowledge (or maybe just as a refresher), you can pick up a copy direct from the publisher here. As a bonus for me, next time we put this period on the table, I might actually know what's going on!

Sunday, 3 September 2023

A British Tar is a soaring soul, and a very tempting target... - TWATS meeting 26th August 2023

A quartet of TWATS met last Saturday for one of our semi-regular gaming sessions, which once again saw me back in the chair (two games running, Temporary Unpaid Chief TWAT! Two!) for a bit of nautical naughtiness and a return to Shipwreck, a ruleset we have used twice before. However, instead of the usual plastic snap kits (and I'd worked on the Type-054A stats especially), we were using Steve's rather tasty little collection of Soviet and Royal Navy ships. 

In the blue corner, the Royaaallllll Naaaayyyveeeeee!

As usual, this was an umpire-led game (a daunting task requiring much support from a Singleton or two, a tasty little malt), with Admiral Andy donning his No. 3 dress, whilst Shaun and Steve began rattling off the Soviet National Anthem in true Red October (the film) style. The aim of the game was simple. The British, comprising of the Invincible (damaged so no flight operations), a Type 42 (the Sheffield), two T22's (Broadsword and Battleaxe) and a Type 21 (Amazon), had to get to the far end of the table. To stop them, the Soviets had the Slava, a Sovremmeny and two Krivak II's. Would the plucky British get away with it, or would the Soviets find the sunrays of freedom cheering them on?

In a different blue corner, the Soviet Military Maritime Fleeeeeet!

Steve and Shaun decided from the get go to split their forces, Steve taking the Sov and a Krivak II, Shaun the Slava and the other Krivak. Aiming for a pincer movement, Steve decided to approach with radars on but, as was apparent by the distance on the table, nothing was detected. A couple of movement turns saw the opposing forces approach each other, and it during movement turn 4 that Andy detected the Sov. A double movement turn (with the agreement of the players) saw the second ship of Steve's flotilla detected by the British. 

A naval Rorke's Drift: them horns look dangerous...

It was only during movement turn 6 that Steve's group detected the Sheffield and Battleaxe. Being a cautious type, Steve launched two SS-N-22 Sunburns at the Sheffield, a sensible choice given the Sea Dart present. Now we were into combat turns.

Andy went loud with his radars and Steve's ships were painted. Battleaxe launched a pair of Exocets at the Krivak, whilst Broadsword had two at the Sov. The second combat turn saw the Sheffield down one of the Sunburns, yet it wasn't all one way as three of the Exocets were shot down by the Soviets. Combat turn three saw a brace of Sea Darts deal with the errant Sunburn, whilst a trio of SA-N-7's handled the final Exocet.

Vampires, Vampires, Vampires!

Back to movement now and it was it was radars-a-go-go with everyone detecting each other. Steve decided more shots were in order so launched all four SS-N-14's from the Krivak II against the Invincible as the Sov lofted four Sunburn's at the Sheffield. Shaun, on the other hand, decided that he was sick of the top weight on the Slava. He fired all sixteen SS-N-12's at the Invincible. It was almost an afterthought for his Krivak II to shoot two '14's at Battleaxe and two at Amazon. Andy's response was to fire his remaining Exocets, a pair at each of the enemy vessels. 

Shaun turning to engage the British

Needless to say, the following few minutes of play decided the afternoon. 

Invincible and Sheffield engaged the incoming from Steve, shooting down one from each missile group. To the south, the Slava tackled the incoming Exocets and downed three out of four.

Are 16(!) SS-N-12's overkill?

The next round of fire took out the last of the Exocets targeting Shaun's duo, whilst Steve managed to shoot down three of his incoming. As for the British defence, Sea Darts accounted for another two of Steve's missiles, leaving Sheffield and the Invincible to face off against a pair of missiles each. 

One or two may have slipped through the defensive screen... eek!

With the incoming down to very short range, and a single Exocet that didn't bother the Soviet defences too much (CIWS shot), it was all on the British to survive the onslaught. Amazon was targeted by two missiles, and shot one down with Sea Wolf before handily avoiding the final one via its EW capabilities. Sheffield was less lucky, taking a direct hit and receiving heavy damage. The two Type-22's were untouched, which was handy as they would have to deal with the after effects of the barrage against Invincible. Of the final 13 missiles, two were hit by Phalanx fire, three were decoyed by chaff, and six succumbed to EW. Even then, of the two that hit, the first impact only caused light damage. Could the pride of the Royal Navy survive to fight another turn? Shaun's dice rolling said no. The final hit was catastrophic, sinking the carrier and effectively ending the game. With more SAM's and bigger guns, the Soviets ruled the table and it was time to retire to the bar and sample that Singleton (again). 

I'm not saying it was an inadequate reply but...

This was a fun game and it was enjoyed by all, despite two of the players knowing very little about floaty boats of this period. The North Atlantic setting was a nice change and, given the end result, demonstrated that quantity (of big SSM's) has a quality all of its own. I mean, sure, you'd not shoot off everything from a Slava in real life (especially the one or two missiles with added buckets of sunshine), but it was a good example of how under-gunned so to speak an RN surface action group could against a Slava. If that hadn't of been there, they would have had a better chance. Maybe a thought for a future play through when we return to Shipwreck some day. 

Once again, many thanks to Stanley Masonic for the use of the bar. Sadly, our regular victualler was on holiday (the very cheek!) so samples of Cooplands finest was our back up.